3D Modeling a Human Head
Category: 3D (Modeling) | Modeling Human Head in 3D Studio MAX
Picture 1. The end result could look for example like this. Notice that this is a stylized head which is not exactly realistic. For example the eyes are too big.
Human head is one of the most difficult subjects to model believably. The structure and form of a human face is so familiar to everyone that even a small fault in the 3D model is easy to notice.
This tutorial covers the 3D modeling of a human head in 3D Studio MAX using polygons. The head is modeled roughly using polygons. The head will get its final form when Meshsmooth modifier is added to it. When the Meshsmooth modifier is added to it the face becomes a so called subdivision surface. Subdivision surface means a surface which is created by dividing the original surface into smaller polygons. Meshmooth modifier does exactly this. This way the rough surface can be made rounder and smoother. The end results is a head similar to the one in picture 1. Notice that this is a stylized head which is not fully realistic. For example the eyes are too big and the ears have been simplified. However, I believe that this model could very well work as a basis for realistic geometry of a human head.
Topology, Edge loops and Poles

Picture 2. In the picture above you can see the polygon construction of the model. By seeing the construction of the model you can conclude how well the model is suited for animation.

Picture 3. The picture above is rendered so that you can see the Isolines of the Meshsmooth modifier.
In picture 2 and 3 you can see the topology and edge loops of the model. By seeing the structure of the model you can conclude how well the model is suited for animation. Edge loop means a row of edges that goes through successive four sided vertices. Four sided vertex is a vertex where four edges meet. In my opinion, in an ideal model that is made for animation edge loops are parallel or perpendicular to the movements of the muscles.
There are almost only four sided polygons (quads) in this model which is good if the model is going to be animated. One should always aim to construct the model from four sided polygons when modeling a character. There are naturally three sided and five sided poles in this model. A pole is a vertex where less or more than four edges meet. Pole ends an edge loop and might sometimes cause trouble in animation. If you want to know more about the subject I recommend reading Bay Raitt's instructions about 3D modeling and edge loops. Another great resource where to find more information about edge loops, head modeling and 3DS MAX is www.cgsociety.com.
3D Studio MAX Tools

Picture 4. Low polygon version of the human head. This is how the complete 3d model will look like before the Meshsmooth modifier is added.
Before starting the 3D modeling one should be familiar with the following concepts and 3DS MAX tools:
- Editable poly
- working in sub-object modes
- copying polygons
- weld
- cut
- extrude
- create
- working in sub-object modes
- Symmetry modifier
- Meshmooth modifier
- Basics about materials
Reference Pictures for the 3D Head

Picture 5. Reference pictures provide a lot of help when modeling a human head.
It's best to use real photographs as reference pictures when modeling a human head but if real photos are not available you can download pictures below.
Create reference pictures in 3D Studio MAX according to picture 5. Change Left view to Right view. Create two plane objects whose size is 512 x 512 (the same as the pixel dimensions of the pictures. It's relevant that the proportion between width and height is the same as in the pictures) and add textures to them. Set the Self-Illumination of the materials to 100 (material will become self illuminating and therefore is easier to see).
Prepare the Views
Turn on Smooth + Highlights (F3) and turn off grid (g) in all view ports. Set the width and height segments to one in both plane objects. The head is considerably easier to to create when we can model according to the reference pictures in the background.
Start Polygon Modeling

Picture 1. Place the first polygon according to the picture. Remember to check the location of the polygon in both Front and Right views.
Start the modeling by creating a plane object in the Front view. Change the width and height segments in the plane object to one. Turn the plane object into Editable Poly (right-click the plane object in modify panel and choose Editable Poly from the menu) Now the object is Editable Poly so you can freely edit it by working in sub-object modes. Activate vertex sub-object mode and move the vertices of the polygon approximately according to picture 1.
Every time you move vertices, segments or polygons or you create new polygons, make sure you check their location both in Front and Right views.
Copying Polygons

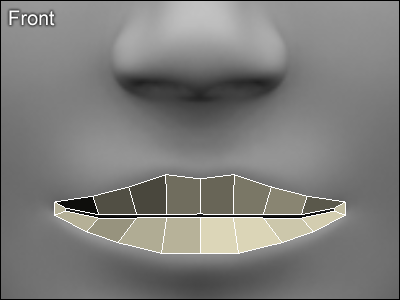
Picture 2. Model lips by using nine polygons.
Create 8 new polygons by copying edges:
- Activate edge sub-object mode in Editable Poly
- Choose the edge you want to copy
- Press shift in keyboard and move the edge
Place the new polygons approximately according to picture 2. Remember that you can move polygons in several different ways:
- in vertex sub-object mode you can move vertices (the most flexible way)
- in edge sub-object mode you can move edges
- in polygon sub-object mode you can move polygons
Symmetry Modifier to the 3D Model

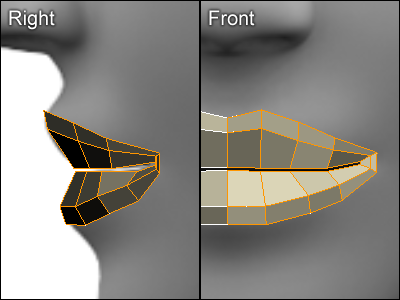
Picture 3. Symmetry modifier is used to mirror the object horizontally. From now on the other side of the face is modeled automatically.
Add symmetry modifier to the model. If necessary adjust the settings of the symmetry modifier. The Symmetry modifier is used to mirror the object horizontally. We still continue to work on the left side of the 3D model and the right side is constructed automatically because of the Symmetry modifier. Now the 3D model should look like in the picture 3.
Show End Result on / off Toggle
Choose Editable Poly from the modifier stack and turn on "Show end result on / off toggle ![]() ". Now you can see the effect of the Symmetry modifier even when you are working in Editable Poly section.
". Now you can see the effect of the Symmetry modifier even when you are working in Editable Poly section.
Meshmooth Modifier
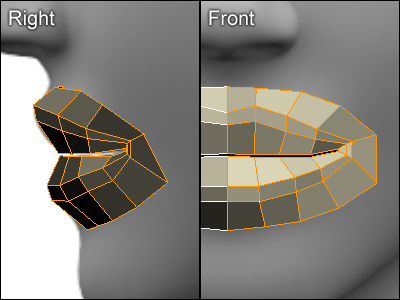
Add Meshsmooth modifier on top of Symmetry modifier and set iterations to 2. Now you see what the complete surface will look like. While working it's often recommended to turn off ![]() the Meshsmooth modifier but turn it on
the Meshsmooth modifier but turn it on ![]() every time you want to see the final surface. If meshmooth modifier is on, the model can be too complicated for hardware and the modeling might slow down.
every time you want to see the final surface. If meshmooth modifier is on, the model can be too complicated for hardware and the modeling might slow down.
New Polygons to the Mouth

Picture 4. New four sided polygons (quads) to the mouth.

Picture 5. Complete mouth modeled with polygons in 3D Studio MAX.
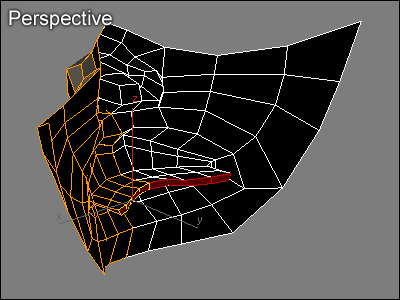
Create new polygons by copying edges. Activate edge sub-object mode in Editable Poly. First choose 9 edges surrounding the lips and copy them by pressing shift in keyboard and using the scale function in 3DS MAX. (You can always copy objects by pressing shift key and using move, rotate or scale functions). Place the new polygons according to picture 4. Repeat the operation and create another ring of polygons to the mouth according to picture 5. Now the outer side of the mouth is complete.
3D Modeling Around the Eye

Picture 1. Copy one polygon and place it under the eye.
Activate the polygon sub-object mode and choose any polygon of the mouth. Press shift in keyboard and copy the polygon under the eye according to picture 1. While copying you are asked whether you want the new polygon to be a separate object or part of the current object. Choose the default option (clone to element). Now the new polygon is part of the same object you have been working on so far.
Target Weld: Polygons Together

Picture 2. There will be a gap between two polygons. This gap can be removed by using Target Weld function in Editable Poly.
Create 9 new polygons by copying edges and place them approximately according to picture 2.
At the moment there is a small gap between two polygons under the eye. Remove the gap by using Editable Poly's Target Weld function in edge sub-object mode:
- Activate the edge sub-object mode
- Activate Target Weld mode
- Click and hold on top of another edge and move it on top of the edge you want to weld it with. Two edges are welded into one.
New Polygons by Scaling

Picture 3. Copy new polygons around the eye.
Activate the border sub-object mode in Editable Poly. In the border mode you can select all edges that circle the element by one click.
Click one of the outer edges to select all outer edges (border) of the eye. Create new polygons by scaling with shift key pressed and place them according to picture 3.
Now the socket for the eye is complete. Later you might be interested about how to create eyes in 3DS MAX. If so I recommend reading the following tutorials:
- Adam Baroody's tutorial about modeling and texturing eye in 3D Studio MAX.
- Krishnamurti Martins Costa's tutorial about eye texture painting.
- Krishnamurti Martins Costa's tutorial about 3D modeling an eye.
Polygons by Copying Edges

Picture 4. Create new polygons by copying edges.
Create new polygons by copying edges according to picture 4. Start from the corner of the eye and remember to check location of each polygon both in Front and Right views. Use Editable Poly's Target Weld if necessary.
Polygons with the Create Function

Picture 5. Create new polygons by using Create function.
Create four new polygons according to picture 5 by using Editable Poly's Create function. Creating four sided polygons with Create function:
- Click Create button
- Click on top of the first vertex
- Click on top of the second vertex
- Click on top of the third vertex
- Double click on top of the fourth vertex
Cut Function in Editable Poly

Picture 1. Cut function in Editable Poly is an easy way of creating new polygons.
Divide the two upper polygons into three parts according to picture 1 by using Editable Poly's Cut function. Using the Cut:
- Click Cut button in polygon sub-object mode.
- Click on the left edge of the left polygon.
- Click on the shared edge of the polygons.
- Click on the right edge of the right polygon.
- Click the right mouse button twice to stop using the Cut.
After cutting the polygons place them according to picture 1.
Polygons with the Create Function

Picture 2. Create new polygons by using Create function in Editable Poly and by copying edges.
Fill the hole in the nose by creating 9 new polygons according to picture 2. Create the new polygons by copying edges and using Editable Poly's Create function. Use Target Weld to weld vertices together when necessary.
Polygons by Copying Edges

Picture 3. Create two new polygons. Remember to weld edges of adjacent faces when necessary.
Create two new polygons by copying edges and place them according to the picture 3.
Editable Poly: Target Weld
Always remember to weld edges or vertices of adjacent polygons by using Editable Poly's Target Weld function. There should never be duplicate vertices or edges in a 3D model.
The Lower Part of the Nose

Picture 4. Structure of the lower part of the nose.
Fill the hole in the lower part of the nose by creating 7 new four edged polygons according to picture 4. There will be a hole in the middle of the new polygons for the nostril.
Nostrils with the Extrude Function

Picture 5. Nostrils are easy to model with Editable Poly's Extrude function.
Fill the hole with one three sided polygon and one four sided polygon. Select the two new polygons and create the nostril by using Editable Poly's Extrude function according to picture 5:
- Find a view like in picture 5
- Click on the Extrude button
- Click and hold on top of the selected polygons and move the mouse
3D Modeling the Forehead

Picture 1. Create new polygons according to the picture.
Create 8 new polygons by copying edges and place them according to picture 1. Remember to use Editable Poly's Target Weld when necessary.
3D Modeling the Jaw

Picture 2. Create 6 new polygons to the jaw.
Create 6 new polygons by copying edges and place them according to picture 2. Like you notice the location of the polygons doesn't exactly follow the profile in the reference picture. The less polygons there are in the model, the more the form must be exaggerated.
In this tutorial the goal is to use as little polygons as possible but still to create reasonably realistic head. Remember that the final surface is formed only when the Meshsmooth modifier is turned on. You should try the effect of the Meshsmooth modifier every now and then.
Polygons of the Side of the Face

Picture 3. Create new polygons according to the picture.
Create new polygons by copying edges and place them according to picture 3. Remember to use Editable Poly's Target Weld when necessary.
Complete the 3D Model of the Face

Picture 4. Create new polygons and finalize the face.
Fill the hole in the face by creating new polygons according to picture 4. Now the face is complete and it should look approximately like in picture 4. This is a good stage to fix characteristics of the face if necessary. Next you will model the back of the head, the neck and the ear.
Polygons to the Jaw

Picture 5. Polygons in the lower part of the jaw.
Create 10 new four sided polygons to the lower part of the jaw and place them according to picture 5.
Polygons to Forehead

Picture 1. Create 10 new polygons to the forehead by copying edges according to the picture.
Create 10 new polygons by copying edges according to picture 1. A hole will be left to the location of the ear at this stage. The ear is modeled and attached to the model later as a separate object because of its complexity.
Modeling the Side of the Head

Picture 2. Create new polygons to the side of the head by copying edges according to the picture.
Create 12 new polygons by copying edges according to picture 2. Remember to use Editable Poly's Target Weld when necessary.
Modeling the Back of the Head

Picture 3. Finalize the back of the head.
Create 20 new polygons to the back of the head by copying edges according to picture 3. Remember to use Editable Poly's Target Weld when necessary.
3D Modeling of the Neck

Picture 4. 6 new polygons to the neck.
Create 6 new polygons to the neck by copying edges and place them according to picture 4. Remember to use Editable Poly's Target Weld when necessary.
Complete 3D Model of the Head

Picture 5. 3D model of the head is complete besides the ear.
3D model of the head is now complete besides the ear. This is a good stage to fix characteristics of the head if necessary. Finalizing the forms of the head is easier now that the model is complete. The model should look like approximately like in picture 5.
Realistic 3D Model of an Ear
In this tutorial the goal is to create as simple as possible but still moderately realistic 3D model of a head. Because of this the ear has been simplified a little and therefore is not completely realistic. If you would like to create fully realistic 3D model of an ear I recommend reading Krishnamurti Martins Costa's tutorial about modeling realistic 3D ear. From www.3dtotal.com site you find also many other high quality tutorials about 3D modeling of a character.
3D Modeling an Ear in 3DS MAX

Picture 1. Start the modeling of the ear by creating polygons according to the picture.
Hide the 3D model of the head and create a new plane object in the Right view. Change the width and height segments in the plane object to one. Turn the plane object into Editable Poly and create new polygons by copying edges according to picture 1.
Remember to use Editable Poly's Target Weld function to weld polygons together when necessary.
Modeling Inner Parts of the Ear

Picture 2. Create new polygons inside of the ear.
Create 4 new polygons by copying edges and place them according to picture 2. Remember to check the location and orientation of the polygons both in the Right and Front views.
Polygons Inside the Ear

Picture 3. Create new polygons according to the picture.
Select 8 edges and create 8 new polygons by copying the selected edges inwards according to picture 3.
Polygons to the Ear

Picture 4. Create new polygons according to the picture.
Create 8 new polygons to the deepest part of the ear according to picture 4. Notice that all 8 polygons are four sided (quads) even though some of them might look like three sided.
More Polygons to the Ear

Picture 5. New polygons inside the ear.
Select 11 edges and create new polygons by copying selected edges inwards according to picture 5. Notice that two vertices must be welded by using Editable Poly's Target Weld in the location marked with yellow circle.
Modeling Inner Parts of the Ear

Picture 1. Vertices have to be welded in locations marked with yellow circles.
Select 10 edges and create new polygons inside the ear by copying edges according to picture 1. Notice, that in three places (marked with yellow circles) vertices have to be welded by using Editable Poly's Target Weld.
Polygons Inside the Ear

Picture 2. New polygons inside the ear.
Select 11 edges and create new polygons by copying edges according to picture 2.
Complete the Inner Part of the Ear

Picture 3. Fill the hole by creating new polygons according to the picture.
Finalize the inner part of the ear by creating new polygons according to picture 3. I count 15 new four sided polygons. Don't worry if you create more or less than 15 polygons. At this stage it's not that important how many polygons there are but how the ear looks like.
Edge of the Ear

Picture 4. Vertices have to be welded in locations marked with yellow circles.
Select 14 edges and create new polygons by copying edges towards the head according to picture 4. Notice that in four places (marked with yellow circles) vertices have to be welded by using Editable Poly's Target Weld.
3D Modeling the Back of the Ear

Picture 5. Create new polygons to the back of the ear.
Select 13 edges in the back of the ear and create new polygons by copying edges according to picture 5.
Polygons to the Base of the Ear

Picture 1. Create 8 new polygons according to the picture.
Create 8 new polygons to the back of the ear according to picture 1. The idea is to decrease the amount of polygons so that it would be easier to attach the ear to the 3D-model of the head.
Finalizing the 3D Model of the Ear
Now the geometry of the ear is complete. At this stage you should finalize the ear as much as possible.
Spline out of the Complete Ear

Picture 2. Create a spline object out of the selected edges.

Picture 3. There is a hole in the place of the ear in the head model.
Now the ear is complete and next you will attach it to the 3D model of the head. Activate the border sub-object mode and select all the edges surrounding the hole according to picture 2. After that click Editable Poly's "Create Shape From Selection" button. Choose Linear as a Shape Type and click OK. You just created a new spline object. Hide the ear and unhide the head. The situation should now be similar to picture 3.
Attach the Spline to the 3D Head

Picture 4. Create 13 new polygons according to the picture.
Activate vertex sub-object mode and use Editable Poly's Attach button to attach the spline object to the head. Spline object will disappear and its vertices are now part of the 3D-model of the head. Activate polygon sub-object mode and use Editable Poly's Create function to create 13 new polygons according to the picture 4. Now there is a hole in the head which matches exactly to the hole in the ear.
Attach Ear's Polygons to the Head
Unhide the ear and attach it to the head by using Editable Poly's Attach function. Now the head and the ear are the same object but there are duplicate vertices in the seam which must be welded. Select all the vertices (24) in the seam and click Editable Poly's settings ![]() button next to the Weld button. Rise the Weld threshold value big enough so that the amount in After is 12 less than the amount in Before. Click OK.
button next to the Weld button. Rise the Weld threshold value big enough so that the amount in After is 12 less than the amount in Before. Click OK.
Finalize the Ear
Move vertices in the ear and around it to make the ear look as natural as possible. Also fix other parts of the head if necessary.
Finalizing the Eye Lids

Picture 1. Eye lids are created by copying edges inwards.
Activate border sub-object mode and select all edges surrounding the eye hole and create new polygons by copying edges inwards according to picture 1.
3D Modeling Inside the Mouth

Picture 2. The mouth is created by copying edges inwards.

Picture 3. Polygons inside the mouth.
Select 9 edges surrounding the hole in the mouth and create new polygons by copying edges inwards according to picture 2.
Activate polygon sub-object mode and use Editable Poly's "Hide Selected" and "Hide Unselected" buttons to hide all polygons except the ones surrounding the mouth. Create new polygons inside the mouth according to picture 3.
Finalize the 3D Model of the Head

Picture 4. Complete 3D model of a human head.
Unhide all polygons and finalize the head. The head is now easier to finalize because all polygons have been created. The complete 3D model could look for example like in picture 4.
It should be fairly easy to modify this model for example to more realistic or more stylized direction. If you wanted you could use this 3D model as a base for many different 3D characters. Let your imagination fly!
1 التعليقات:
.Muito obrigado
إرسال تعليق